Lightweight Bendable Stone Wall Cladding: A Manufacturer's Guide to Flexible Facade Solutions
2026-09-04
Bendable stone sounds like a paradox—until you see it wrap around a curved facade. Lightweight bendable stone wall cladding is turning that paradox into practical design freedom, and Magic Stone is one of the manufacturers leading the charge. This guide explores how flexible facade solutions work, where they fit, and what you need to consider before specifying them.
What Makes Stone Bend Without Breaking
Most people think of stone as the definition of rigidity—tap it with a hammer and it chips or shatters. Yet walk through a mountain range and you'll see rock layers folded into sweeping curves, twisted like ribbons. The secret lies in conditions far removed from a stonemason's workshop. Deep underground, heat softens the crystal structure, while immense pressure prevents cracks from opening. Over millions of years, solid rock flows at a pace slower than a fingernail grows, bending rather than breaking.
At the microscopic level, this flexibility comes from the movement of individual mineral grains. Under enough pressure, crystals slide past each other along tiny internal defects, much like a deck of cards shearing sideways. Simultaneously, minerals dissolve at points of high stress and recrystallize where pressure is lower, a process that lets the rock adjust its shape without fracturing. Limestone and marble are particularly good at this, which is why folded marble cliffs often look like frozen waves.
Time is the true enabler. A sudden bend would snap any stone, but spread the same deformation across eons and the rock responds like cold honey. This slow-motion dance explains why ancient stone beams sometimes sag gracefully over centuries, and why the Earth's crust can crumple into mountain chains without the whole planet shattering. The next time you see a warped stone wall or a curved rock outcrop, remember: given enough patience, even the most brittle material learns to yield.
Where Flexible Stone Veneer Fits Best
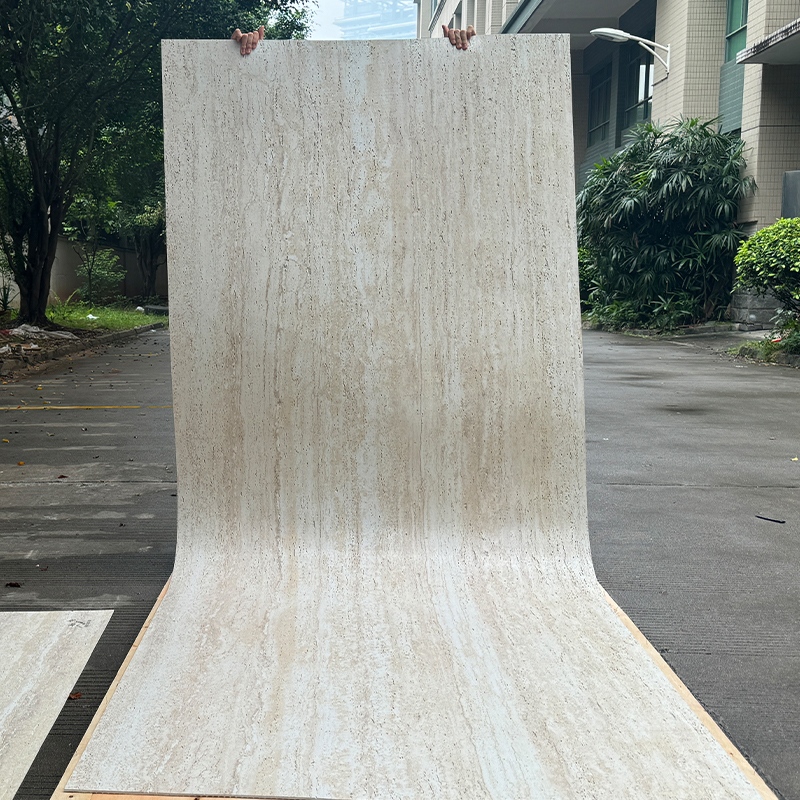
Flexible stone veneer fits best in spaces where traditional stone would be too heavy, rigid, or expensive to install. Think curved feature walls in entryways, fireplace surrounds with awkward angles, or kitchen islands that need a seamless wrap. The material's thin profile and bendability let it follow contours that would crack or demand extensive cutting with standard stone panels. It works especially well for accent walls in living rooms or bedrooms where you want texture without the structural reinforcement.
Another place it shines is in high-moisture zones like bathrooms and laundry rooms, since the resin backing resists water far better than natural stone veneer. You can run it behind a freestanding tub, across a shower niche, or up a backsplash without worrying about grout lines trapping mildew. For exterior applications, covered entryways and porch columns are ideal — direct sun and rain can eventually cause fading or edge lifting, so keep it under an eave or overhang.
Avoid using it on floors, heavy traffic surfaces, or any area where abrasion is constant. It's a decorative surface, not a wear layer. If you're after a stone look in a spot that would otherwise need a mason, flexible stone veneer is a solid choice, but it needs to stay out of the path of daily scuffs and sharp impacts.
Preparing Surfaces for Curved and Textured Walls
Working with curved or textured surfaces throws out the standard playbook. Flat sanding blocks and rigid scraping tools either skip over the high points or dig into the low spots, leaving you with an uneven foundation that will haunt the final finish. Start by accepting that precision here means adapting pressure and angle on the fly. For textured wallpaper or plaster relief, a soft-bristle brush followed by a vacuum with a brush attachment removes dust without flattening the pattern. On gentle curves like archways or rounded columns, switch to flexible sanding sponges that conform as you move, creating enough tooth for adhesion without cutting through the underlying shape.
If the texture is too pronounced for a smooth finish, consider a skim coat only on the areas that will be seen up close, then feather it out so the transition disappears into the shadow lines. Don't fight the wall's character; instead, use a bonding primer designed for uneven porosity—this helps paint grab evenly across both recessed and raised zones. Test a small patch first, because some textured paints contain vinyl or slick additives that resist even the best prep. A quick wipe with denatured alcohol on an inconspicuous corner will tell you if you're dealing with a standard surface or something that needs a dedicated deglosser.
Finally, remember that drying time behaves differently on three-dimensional surfaces. Recesses hold moisture longer, which can cause bubbles or peeling if you rush the topcoat. After cleaning and priming, run your hand slowly over the wall—not just to check for smoothness, but to feel for temperature differences that hint at hidden damp spots. Give those areas an extra day to cure. When you move to the actual painting, use a brush for the first pass on heavy texture, working the paint into every groove before following with a roller. That two-step approach prevents the thin, starved look that happens when only the peaks get coated.
Choosing Backing Materials and Adhesives That Last
Plywood and gypsum board might look fine on a shelf, but they behave very differently once humidity, temperature swings, and years of use enter the picture. A backing material needs to hold fasteners without splitting, resist warping when the air gets damp, and keep its flatness under repeated load. Baltic birch plywood, marine-grade panels, or high-density fiberboard tend to outperform standard construction-grade sheets because their layers are bonded with moisture-resistant resins and their cores stay stable long after cheaper boards start to bow.
The adhesive side is just as decisive as the board itself. A contact cement that grabs instantly can fail within a few seasons if it turns brittle in cold weather or softens near a heat source. Instead, look for a two-part epoxy, a polyurethane construction adhesive, or a modified silane polymer that cures flexible but strong. These bond lines tolerate movement between dissimilar materials, so a metal bracket fixed to a wood panel won't peel away when each surface expands at its own rate.
Surface prep deserves more attention than most people give it. Even the toughest adhesive cannot hold onto dust, oil, or a glossy finish. Sand the contact area lightly, wipe it with a solvent that leaves no residue, and test a small patch before committing to the full assembly. If the project will face direct sunlight, rain, or cleaning chemicals, choose a backing and adhesive rated for that specific exposure rather than assuming an all-purpose product will cope.
Balancing Thin Profiles with Impact Resistance
Thin doesn't have to mean fragile. The old approach was to add material everywhere, but that just makes a case bulky. Instead, designers now concentrate reinforcement at the corners and along the edges, where drops actually hit. The rest of the shell stays remarkably slim, so the phone still feels close to bare in the hand. Impact energy gets routed into those localized buffer zones rather than spreading through the entire frame.
Material pairing does a lot of the heavy lifting here. A hard polycarbonate outer layer resists scratches and keeps the structure rigid, while an inner TPU or silicone liner absorbs and dissipates shock. When these two are bonded or co-molded, the total wall thickness can stay under 1.2 millimeters and still survive repeated drop tests. Some manufacturers also add subtle ribbing or a honeycomb pattern on the inside face, which improves stiffness without adding noticeable bulk.
Getting the balance right depends more on tuning than on a single magic material. Engineers run simulations for common drop angles and then locally thicken high-stress areas by just 0.2 to 0.3 millimeters. Everywhere else gets shaved down as much as possible. The result looks slim in a product shot but behaves like a much thicker case when it hits concrete. That kind of micro-optimization is what separates a thin case that cracks on day one from one that quietly does its job for a year.
Working with Manufacturers on Custom Finishes and Sizes
Many brands think they are stuck with whatever finishes and dimensions appear in a catalog, but that assumption often leaves money on the table. When you start a conversation with a manufacturer during the design phase, you can frequently negotiate custom options like a brushed bronze handle instead of polished nickel, or a powder coat tinted to match your brand palette. Dimensions are just as negotiable—some factories will adjust shelf depths, leg heights, or overall proportions for a modest setup fee, especially if your order volume gives them room to work.
The trick is to come prepared with clear specs and a willingness to ask pointed questions. Instead of saying you want a warmer wood tone, send a physical sample or a reference photo, then ask about minimum order quantities and lead times for a custom finish. Manufacturers appreciate specificity because it reduces back-and-forth. Also inquire about smaller custom touches like edge profiles, corner radii, or recessed hardware openings. Those details can make your product feel entirely unique without requiring a massive tooling investment.
Finally, leave room in your timeline for prototyping and approval loops. Custom work rarely hits the mark on the first try, so expect to review a pre-production sample under different lighting conditions or with your actual materials on hand. A reliable manufacturer will send that sample for sign-off before starting the full run, and that is your chance to catch subtle issues like a finish that looks too glossy or a size that feels slightly off. If you treat the relationship as a joint problem-solving effort rather than a simple purchase order, you will discover that custom finishes and sizes are well within reach for even smaller brands.
FAQ
It's a thin veneer of real stone bonded to a flexible backing, usually fiberglass or polyester. Conventional stone panels are 20-40 mm thick and rigid, while this material runs 2-5 mm thick and weighs around 1.5-3 kg per square meter. That lets it flex around curves without cracking.
The process starts with natural stone like slate or mica schist that naturally splits into thin layers. Those veneers get peeled away and laminated onto a polymer or fiberglass carrier with a high-strength adhesive. The top surface keeps its original texture and color because it's untouched real stone, just backed for flexibility.
You can install it on drywall, plywood, cement board, concrete, old tile, and even metal surfaces. The key is that the substrate must be clean, dry, and smooth. Any bumps or loose paint will telegraph through the thin material, so a light sanding or skim coat is usually worth the time.
Yes, that's one of its main advantages. Most products handle a minimum bending radius of 30-50 cm without issue. Thinner versions or those with a more elastic backing can go tighter, but you need to warm the material slightly with a heat gun on sharp curves to avoid creasing.
A polyurethane or hybrid polymer adhesive works best because it stays slightly elastic and bonds well to both the backing and the substrate. You'll also need a notched trowel, a sharp utility knife for trimming, and a heat gun for softening the material around edges and corners.
The stone surface itself is UV-stable, but the backer and adhesive need to be rated for exterior use. Sealing the edges during installation prevents water from wicking between layers. In terms of temperature, quality products handle -30°C to 80°C without delaminating, as long as they aren't constantly submerged.
Not much. Occasional washing with plain water and a mild detergent keeps the surface looking fresh. You should check joint sealant every few years, especially in freeze-thaw climates. Avoid pressure washing at close range because the high force can lift edges.
Material cost per square meter is usually below natural stone slabs, though higher than basic PVC or wood-plastic options. The bigger savings come from labor and time since it cuts with a knife, needs no heavy framing, and installs much faster than rigid panels.
Conclusion
Flexible stone cladding works because thin slices of real stone are bonded to a polymer or fabric backing, letting the material bend around curves without fracturing. The stone layer is typically one to two millimeters thick, which relieves internal stress while the backing carries tensile load. This makes the product especially useful on curved feature walls, reception desks, column wraps, and even furniture fronts. Before installation, surfaces need to be clean, dry, and smooth; curved substrates often benefit from a skim coat or flexible filler to avoid telegraphing irregularities. Choosing a compatible adhesive is just as important as the stone itself. Polyurethane and hybrid polymer adhesives generally outperform standard thin-set mortars because they remain slightly elastic after curing, which helps the veneer move with the building.
Despite the thin profile, modern flexible stone veneers are surprisingly tough. The backing material—often fiberglass mesh, non-woven polyester, or a reinforced resin sheet—absorbs impacts and prevents cracks from spreading through the stone face. For high-traffic zones, a clear protective topcoat can add scratch resistance without changing the natural texture. Manufacturers also offer a wide range of custom options, from slab-format sizes and edge profiles to bespoke color blends and matte or gloss finishes. If a project requires unusual dimensions or a specific hue, working directly with the factory on a batch order can save time and reduce waste, since flexible stone is cut more easily than rigid panels and can be produced in rolls or sheets that match the installation layout.
Contact Us
Contact Person: Vito
Email: [email protected]
Tel/WhatsApp: 86 13088879266
Website: https://www.magicstonemcm.com